Ben's Log

Ben的程式學習筆記


  • 首頁

  • 分類

  • 關於

  • 歸檔

  • 標籤

在typesript中將string轉為int

發表於 2016-07-21

title: Turn String Into Int with Typescript


最近用到PirmeNG的datatable來編輯資料,可是有個問題就是編輯過後的數值會從int變成string,導致後來做加減乘除的運算上會出現問題,所以必須要轉回int。

下面要針對records中的amount進行加總

1
2
3
for( var r of this.records) {
this.columnSum.amount += r.amount;
}

因為r.amount被轉為string了,原本想透過parseInt轉回來,可以在typescript中我把amount宣告為number,所以無法使用parseInt這個function。但是可以透過+這符號來轉換為數值。

```
for( var r of this.records) {
this.columnSum.amount += +r.amount;
}
Git 基礎用法: Branch, merge

發表於 2016-07-21

title: Git basic usage


開新的分支

git checkout -b new_branch_name: 新增一個分支,等同於
git branch new_branch_name + git checkout new_branch_name

合併

當new_branch開發完成之後,要合併到master當中。
git checkout master: 切換回主幹

git merge new_branch: 合併至主幹

git push: 推送至遠端倉庫

其他

git branch: 顯示目前的分支

git checkout branch_name: 換到指定的branch

[Note of Angular 2] 在 Angular 2 中使用 Lovefield

發表於 2016-07-18   |   分類於 angular 2

title: ‘[Note of Angular 2] Using Lovefield in Angular 2’


簡介

Lovefield是什麼呢? 簡單來說就是google出品的工具,可以幫助開發者們在客戶端來儲存結構化的資料,並且可以透過SQL的語法來進行查詢。

安裝

1
2
npm install lovefield --save
typings install dt~lovefield --global --save

設定

在index.html檔案中加入以下script

1
<script src="node_modules/lovefield/dist/lovefield.min.js"></script>

在typings.json的globalDependencies區塊中加入以下兩行

1
2
"es6-promise": "registry:dt/es6-promise#0.0.0+20160423074304",
"lovefield": "registry:dt/lovefield#2.0.62+20160317120654"

使用方法

參考官方的範例,todo_typescript

1
2
3
4
5
6
7
8
9
10
11
12
13
14
15
16
17
18
19
20
21
22
23
24
25
26
27
28
29
30
31
32
33
34
35
36
37
38
39
40
41
function main(): void {
var schemaBuilder: lf.schema.Builder = lf.schema.create('todo', 1);

schemaBuilder.createTable('Item').
addColumn('id', lf.Type.INTEGER).
addColumn('description', lf.Type.STRING).
addColumn('deadline', lf.Type.DATE_TIME).
addColumn('done', lf.Type.BOOLEAN).
addPrimaryKey(['id'], false).
addIndex('idxDeadline', ['deadline'], false, lf.Order.DESC);

var todoDb: lf.Database = null;
var dummyItem: lf.schema.Table = null;
var connectOptions: lf.schema.ConnectOptions = {
storeType: lf.schema.DataStoreType.MEMORY
};
schemaBuilder.connect(connectOptions).then(
function(db) {
todoDb = db;
dummyItem = db.getSchema().table('Item');
var row = dummyItem.createRow({
'id': 1,
'description': 'Get a cup of coffee',
'deadline': new Date(),
'done': false
});

return db.insertOrReplace().into(dummyItem).values([row]).exec();
}).then(
function() {
var column: lf.schema.Column = (<any>dummyItem).done;
return todoDb.select().from(dummyItem).where(column.eq(false)).exec();
}).then(
function(results) {
results.forEach(function(row) {
console.log((<any>row).description, 'before', (<any>row).deadline);
document.body.textContent =
(<any>row).description + ' before ' + (<any>row).deadline;
});
});
}

[Note of Angular 2] UI的新選擇: PrimeNG使用說明

發表於 2016-07-18   |   分類於 angular 2

title: ‘[Note of Angular 2] How to set up PrimeNG (Angular UI)’


  1. 利用npm安裝PirmeNG的兩個套件

    1
    2
    3
    4

    npm install primeng --save

    npm install primeui --save
  2. 在index.html中載入CSS檔

    1
    2
    3
    4
    5
    6
    7
    <head>

    <link rel="stylesheet" type="text/css" href="node_modules/primeui/themes/omega/theme.css" />
    <link rel="stylesheet" type="text/css" href="app/resources/icons/css/font-awesome.min.css" />
    <link rel="stylesheet" type="text/css" href="node_modules/primeui/primeui-ng-all.min.css" />

    </head>
  3. 在systemjs.config.js更改map, packages

    1
    2
    3
    4
    5
    6
    7
    8
    9
    10
    11
    12
    13
    14
    15
    16
    // map tells the System loader where to look for things
    var map = {
    'app': 'app', // 'dist',
    'rxjs': 'node_modules/rxjs',
    'angular2-in-memory-web-api': 'node_modules/angular2-in-memory-web-api',
    '@angular': 'node_modules/@angular',
    'primeng': 'node_modules/primeng' //新增此行
    };

    // packages tells the System loader how to load when no filename and/or no extension
    var packages = {
    'app': { main: 'boot.js', defaultExtension: 'js' },
    'rxjs': { defaultExtension: 'js' },
    'angular2-in-memory-web-api': { defaultExtension: 'js' },
    'primeng': { defaultExtension: 'js' } //新增此行
    };

使用方法,在ts檔內import所需的extension,並且加入到directives中,詳細說明請參考官方文件。

1
2
3
4
5
6
7
8
9
10
11
12
13
14
import {Component} from '@angular/core';
import {InputText} from 'primeng/primeng'; //import所需的extension

@Component({
selector: 'my-app',
template: `
<h1>My First PrimeNG App</h1>
<input type="text" pInputText/>
`,
directives: [InputText] //加入到directives中
})
export class AppComponent {

}

參考:
PrimeNG Setup

[Note of Angular 2] 將js, map等檔案編譯至特定資料夾

發表於 2016-07-17   |   分類於 angular 2

title: ‘[Note of Angular 2] Compile to another folder’


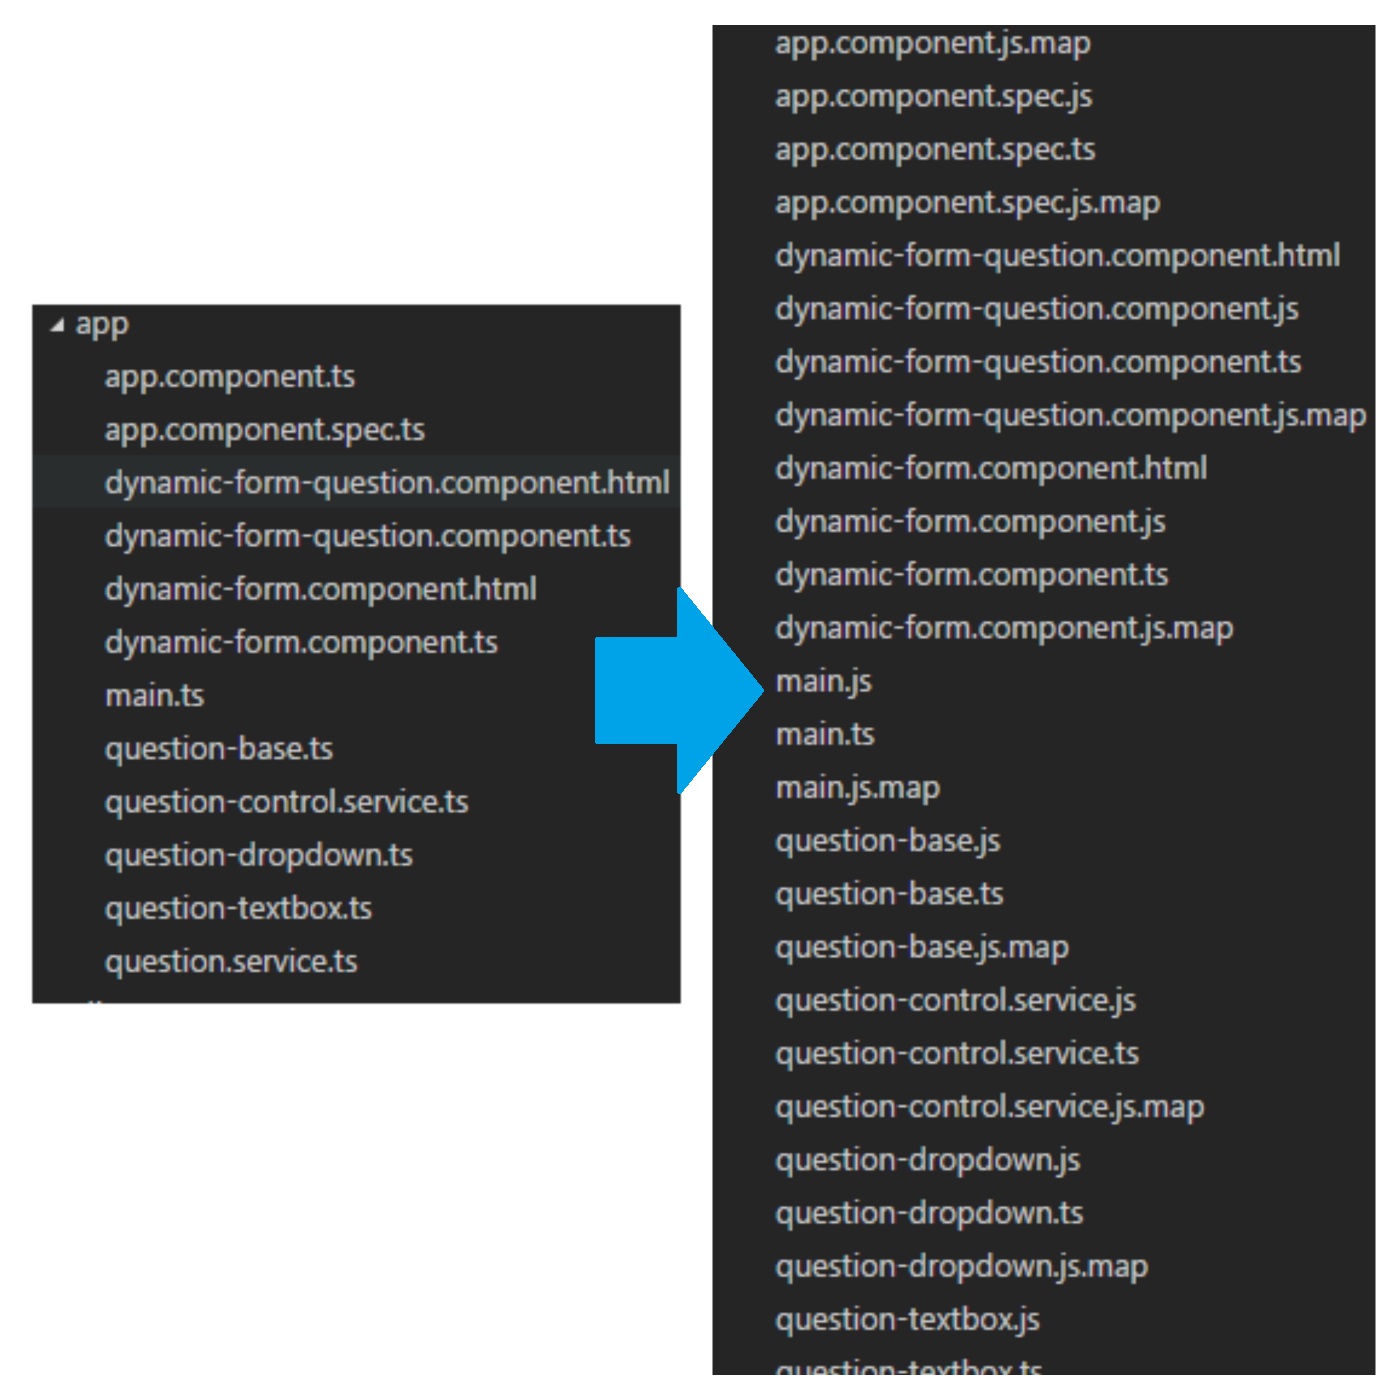
用typescript寫好程式之後,一但編譯之後,會多出許多XXX.js, XXX.map的檔案,會使得未來在尋找檔案上變得非常麻煩。所以可以使用以下的方法來將那些檔案編譯至特定資料夾。

after compiled

  1. 編輯systemjs.config.js檔案
1
2
3
4
5
6
7
var map = {
'app': 'dist/app', // 更改此行,

'@angular': 'node_modules/@angular',
'angular2-in-memory-web-api': 'node_modules/angular2-in-memory-web-api',
'rxjs': 'node_modules/rxjs'
};

2.
編輯tsconfig.json

1
2
3
4
5
6
7
8
9
10
11
12
13
14
{
"compilerOptions": {
"target": "es5",
"module": "commonjs",
"moduleResolution": "node",
"sourceMap": true,
"emitDecoratorMetadata": true,
"experimentalDecorators": true,
"removeComments": false,
"noImplicitAny": true,
"suppressImplicitAnyIndexErrors": true,
"outDir": "dist" //新增此行
}
}

把原本/app內的js, map等檔案刪除,重新npm tsc編譯一次就會發現那些檔案都移動到/dist/app資料夾內了。

[Note of Angular 2] Getting start

發表於 2016-07-17   |   分類於 angular 2

title: ‘[Angular 2 學習筆記] 開始第一個網頁’


  1. 首先需要安裝node.js
  2. clone 官方的範例

    1
    2
    git clone  https://github.com/angular/quickstart  my-proj
    cd my-proj
  3. 移除git相關的檔案

    1
    2
    rm -rf .git  // Mac, Linux
    rd .git /S/Q // windows
  4. 安裝相關的檔案

    1
    npm install
  5. 啟動local端的server

    1
    npm start

如何使用firebase hosting架設靜態網站

發表於 2016-06-15

今天來介紹一下firebase hosting這個服務,firbase hosting可以幫助我們直接用很簡單的方式把靜態網頁(html, js)部屬到到firebase上。
多簡單呢?只需要三個步驟就可以完成一個具有https加密的網站,還可以綁定自己的網址

  1. install
  2. init(包含 login)
  3. deploy

install

第一步需要安裝firebase-tools

1
npm install -g firebase-tools

init(包含 login)

第二步建立一個資料夾(demo-web)並登入firebase,在登入時它會詢問是否讓它匿名收集使用資訊,輸入Y or n選擇後會打開一個授權網頁,點選確認就完成登入了。
firebase auth
另外firebase綁定gmail,請事先先去申請一個。
有些時候我們可能會想要另外申請一個專門for firebase的google帳號,而該帳號又不是在你常用的瀏覽器(e.g., chrome)登入的話,可以複製terminal下的那一長串網址到其他的瀏覽器(e.g., firebase, safari)來登入。

1
2
3
4
5
6
7
8
9
10
$ mkdir demo-web
$ cd demo-web
$ firebase login
Allow Firebase to collect anonymous CLI usage information?(Y/n)

https://accounts.google.com/o/oauth2/auth?xxxxxxxxxx

Waiting for authentication...

✔ Success! Logged in as your_firebase@gmail.com
1
2
3
4
5
6
7
8
9
10
11
12
13
14
15
16
17
18
19
20
21
22
23
$ firebase init

選擇第二個選項Hosting
What Firebase CLI features do you want to setup for this folder?
◉ Database: Deploy Firebase Realtime Database Rules
❯◉ Hosting: Configure and deploy Firebase Hosting sites

輸入Database Rules的檔案名稱,可以直接按Enter使用database.rules.json
What file should be used for Database Rules?(database.rules.json)

輸入網頁檔案要放置的資料夾名稱,可以直接按Enter使用public
What do you want to use as your public directory? (public)

決定是否設定為single-page app
Configure as a single-page app (rewrite all urls to /index.html)?

如何還沒在firebase的console建立新的project的話,就選擇new
What Firebase project do you want to associate as default?

✔ Firebase initialization complete!

Project creation is only available from the Firebase Console
Please visit https://console.firebase.google.com to create a new project, then run firebase use --add

若沒有事先建立project,請到console建立,再透過firebase use --add來設定網站對應的project
進入console點選Create Project建立一個新的project
Create project
建立成功之後,點選左方選單的database可以看到https://fir-web-apple01.firebaseio.com/類似的網址,其中的fir-web-apple01就是project的名稱

1
2
3
4
5
6
$ firebase use --add
? Which project do you want to add? fir-web-apple01
? What alias do you want to use for this project? (e.g. staging) demo-web

Created alias demo-web for fir-web-apple01.
Now using alias demo-web (fir-web-apple01)

deploy

輸入deploy就完成啦。

1
$ firebase deploy

除了第一次弄要登入,初始化等比較麻煩一些之外,之後修改完public內的檔案直接firebase deploy就可以更新網站了。
Enjoy it.

機器學習個案研究II-以回歸方程預測房價

發表於 2016-03-24   |   分類於 machine learning

簡介

第二週的課程,正式進入到個案的部分。本次要探討的主題是如何預測房價?相信這是很多人都想要知道的一件事情,尤其在買賣房屋的時候。假設我們是買方,我們會想要知道這間房子大概值多少錢?它有三層樓,坪數是一百二十坪,有三間浴室,附有兩個停車位。

我們使用到一個很基本的分析方法,回歸方程式。一條回歸方程式分為兩個部份:自變數(independed variable)與應變數(dependend variable)。顧名思義,自變數就是可以我們自己來改變它的值的數字,像是每間房子的大小、浴室數量等,這些我們也把它稱為屬性。而應變數指的就是會隨著自變數而跟著改變的數值,像是房子的價格會隨著坪數的大小而改變。

而透過回歸的方式就是希望可以找到一條方程式,把自變數的值(房子的屬性)丟進去之後,就可以得到應變數(價錢)是多少。

有了這最基本的認知之後,就可以開始使用python去做分析與預測了(詳細關於回歸方程式的介紹我在此就先不多說,有興趣可以自行翻閱相關資料,或是我有空再補充)。

#程式實作

1
2
3
4
5
6
7
8
9
10
11
12
13
14
15
16
import graphlab
# 載入房地產的資料
sales = graphlab.SFrame('home_data.gl/')

# 直接查看一下匯入的資料,共有21613筆資料,每筆資料有21個欄位
sales

# 將canvas的顯示目標設定在ipython notebook內
graphlab.canvas.set_target('ipynb')
sales.show(view="Scatter Plot", x="sqft_living", y="price")
#

#
#
#
#

機器學習個案研究I-環境設定

發表於 2016-03-18

簡介

本系列文章主要為記錄Coursera上的Machine Learning Foundations: A Case Study Approach,主要分為理論與實作兩個部分。實作的部分,使用的語言為Python。課程分為六周,我會盡量紀錄並補充相關資訊。

環境設定

本系列課程主要需要使用到的套件為GraphLab Create,有一年的免費授權可以使用,若為教育用途,則每年可免費更新授權。使用的開發工具為IPyhon Notebook。

取得GraphLab Create授權

GraphLab Create為Dato公司的一項產品,非常方便的使用Python來進行Machine Learning。

首先,先到官網進行註冊,
註冊頁面

安裝

註冊完之後會取得自己的Product Key,註冊之後可以取得下載連結。
基本上有三種方式可以安裝GraphLab Create

  1. Dato Luancher
  2. Anaconda Python Environment
  3. virtualenv Python Environment

大家平常可能比較常使用virtualenv來建立python的環境,但為了簡單方便起見,我使用Dato Luancher這個整合安裝包來進行。(如果你是使用Linux的環境只有2, 3可以選了)

安裝好之後,輸入剛剛註冊的Email與Key,就會帶到以下畫面。點選右方IPYTHON NOTEBOOK按鈕就會在瀏覽器打開IPython notebook的頁面。
Data Luancher

IPython notebook

Python的基本語法在此就不多提了,注意一下IPython是由一個一個的cell所組成的,cell有分code, markdown等,可以在上面的選單列進行調整。要執行code cell內的python程式碼,就按下Shift + Enter即可。

基本python語法複習看這裡,把這個檔案移到IPython的home資料夾就打開它就可以了。

GraphLab Create

把以下兩個檔案放到Home底下的資料夾,可以自行建立一個Machine Learning的資料夾來管理自己的資料夾。

下載範例資料people-example.csv

下載notebook檔W1-GraphLab-SFrame.ipynb

ipynb這個檔案源自於該堂課程,我加入了部分的中文註解,方便大家了解。建議自行開啟一個新的notebook來練習。

Hello World

發表於 2016-03-17

Welcome to Hexo! This is your very first post. Check documentation for more info. If you get any problems when using Hexo, you can find the answer in troubleshooting or you can ask me on GitHub.

Quick Start

Create a new post

1
$ hexo new "My New Post"

More info: Writing

Run server

1
$ hexo server

More info: Server

Generate static files

1
$ hexo generate

More info: Generating

Deploy to remote sites

1
$ hexo deploy

More info: Deployment

12
Ben-do

Ben-do

Angular, python, data mining, machine learning

20 文章
8 分類
19 標籤
© 2016 Ben-do
由 Hexo 強力驅動
主題 - NexT.Muse