Ben's Log

Ben的程式學習筆記


  • 首頁

  • 分類

  • 關於

  • 歸檔

  • 標籤

如何在Mac上安裝pymssql

發表於 2016-10-22   |   分類於 python

title: how to install pymssql on mac

tags: python, mac

首先需要先安裝FreeTDS,什麽是FreeTDS呢?簡單來說就是讓Unix, or Linux系統可以與MS SQL溝通的一個函式庫。

  1. brew install freetds: 利用homebrew來安裝
  2. `pip install pymssql`: 再來使用pip安裝即可。

沒了,簡單記錄一下。原本直接安裝的時候會出現fatal error: 'sqlfront.h' file not found的錯誤。

貝氏定理應用

發表於 2016-10-22   |   分類於 machine learning

title: “Bayes’ Rule Example”
tags: 貝氏定理, machine learning


貝氏定理應用

透過檢驗HIV的範例來了解貝氏定理的應用。

首先我們知道用ELISA檢驗HIV的機率分別為

  • True Positive, P(+ | has HIV): 0.93
  • True Negative, P(- | no HIV): 0.99

同時也知道得到HIV的機率為

  • P(HIV): 0.00148

想要知道檢驗結果為+的情況下,也的確有HIV的機率為多少,即P(has HIV | +)。

  • P(HIV) = 0.00148
    • P(+ | HIV) = 0.93
    • P(- | HIV) = 0.07
  • P(no HIV) = 0.99852
    • P(+ | no HIV) = 0.01
    • P(- | no HIV) = 0.99

套用貝氏定理P(B|A) = P(A, B) / P(A),也就是

  • P(HIV | + ) = P(HIV, +) / P(+)

  • P(HIV, +) 表示兩者同時發生的機率,0.00148 * 0.093 = 0.0013764

  • P(+) 就是所有檢驗出來為+的機率,包含有HIV檢驗出為+的0.0013764與沒有HIV卻檢驗出為+的0.99852*0.01 = 0.0099852,故P(+)為0.0013764+0.0099852 = 0.0113616
  • P(HIV | + ) = 0.0013764 / 0.0113616 = 0.12

所以透過ELISA檢驗為+的情況下,實際得到HIV的機率也只有0.12。

這時候,如果有人被檢驗出為+,去檢查第二次又是+,那他實際得到HIV的機率會變多少呢?因為是檢驗第二次了,我們已經得知他的

  • P(has HIV) = 0.12
  • P(no HIV) = 0.88
  • P(HIV, +) = 0.12 * 0.93 = 0.1116
  • P(+) = 0.12 0.093 + 0.88 0.01 = 0.1204
  • P(HIV | + ) = 0.1116 / 0.1204 = 0.93

如果兩次檢驗都是+,就比較中獎機率高達93%,如果三次都是+的話…

Python當中的slice用法

發表於 2016-09-15   |   分類於 python

title: how to use slice in python
tags: python


假設我們有一個長度為8的陣列a,其編號與對應到得值分別如下表。
a = [10, 20, 30, 40, 50, 60, 70, 80]

編號 0 1 2 3 4 5 6 7
值 10 20 30 40 50 60 70 80

以往我們存取陣列的數值常常都是透過編號的方式,例如a[1]的值就是20。在python內可以使用一種更強大且方便的工具來操作陣列。

存取陣列內元素

slice的用法就是在中括號[]內加入冒號:,形式長這樣a[i:j]這是什麼意思呢?i為我要存取之陣列起始編號,j為陣列之結束編號。就是我要存取a陣列當中的從編號i到編號j的元素。注意,它是包含i,不包含j的。用數學的表示方式大概就是[i, j)。i, j如果有沒值的話就是代表該陣列的起始點與結束點。

用四個小範例來展示一下更加清楚。

閱讀全文 »

利用numpy的newaxis轉變矩陣的形狀

發表於 2016-09-15   |   分類於 python

title: hange shape of matrix by numpy
tags: python, numpy


簡單筆記一下:
有一個一維陣列x1,我分別想要把它變成一個3*1的矩陣x2,以及1*3的矩陣x3,作法如下。

1
2
3
4
5
6
7
8
9
10
11
12
13
14
15
16
17
18
19
20
21
22
23
24
import numpy as np
x1 = np.array([10, 20, 30], float)
print "shape of x1 is ", x1.shape
print x1

x2 = x1[:, np.newaxis]
print "shape of x2 is ", x2.shape
print x2

x3 = x1[np.newaxis, :]
print "shape of x3 is ", x2.shape
print x2

---result---
shape of x1 is (3,)
[ 10. 20. 30.]
shape of x2 is (3, 1)
[[ 10.]
[ 20.]
[ 30.]]
shape of x3 is (3, 1)
[[ 10.]
[ 20.]
[ 30.]]

用SQLAchemy 動態加入多個查詢條件

發表於 2016-09-10   |   分類於 python

title: Dynamically add multiple condition into SQLAchemy query
tags: SQLAchemy, flask, python


用SQLAchemy 動態加入多個查詢條件

使用者輸入的查詢條件有多有少,數量不等,我們要怎麼動態的將這些查詢條件加入到我們的SQL指令當中呢?

假設我們是一個餐廳的查詢系統,使用者可以透過餐廳所在地點, 開放時間, 菜色來查詢喜歡的餐廳。使用者可能會只篩選地點,或是同事篩選三個,產生的組合就會有六種。我們不太可能寫六個SQL指令,將來如果查詢條件變多的話那不就要寫更多?

閱讀全文 »

使用ngrok讓外部使用者連入localhost

發表於 2016-08-23   |   分類於 tools

title: make others connect to your localhost via ngnok

tags: tools


使用ngrok讓外部使用者連入localhost

開發的過程有時候總會需要別人來測試一下你目前的程式,我們一般不會想要為此把程式放上伺服器,因為通常還需要改來改去的,所以就可以使用ngrok來幫助我們解決這煩惱。

它的功用就是讓別人透過ngrok的一組網址來讓他人連進你開發時使用的電腦(localhost:XXXX之類的)。如官網的圖所示:右邊是正在開發程式的你,左邊可能就是測試者or其他合作夥伴之類的。
ngrok示意圖

閱讀全文 »

manage python package via conda

發表於 2016-08-23   |   分類於 python

title: manage python package via conda

tags: python


使用conda來管理python的套件

為什麽會用到conda而不是virtualenv呢…因為之前上machine learning的時候安裝anaconda會一次裝好大部分常用的科學套件,所以就接著用了。

建立虛擬環境

首先,需要先建立一個虛擬環境並啟動它,然後才可以安裝新的套件。
注意,在建立的時候,需要先指定一個套件,本文建立的虛擬環境名稱為chatbot_env,先安裝flask這套件。
此虛擬環境預設的安裝路徑位於/Users/XXX/anaconda/envs/chatbot_env/。

閱讀全文 »

使用k-means分群的三個缺點

發表於 2016-08-20   |   分類於 machine learning

使用k-means分群的幾個缺點

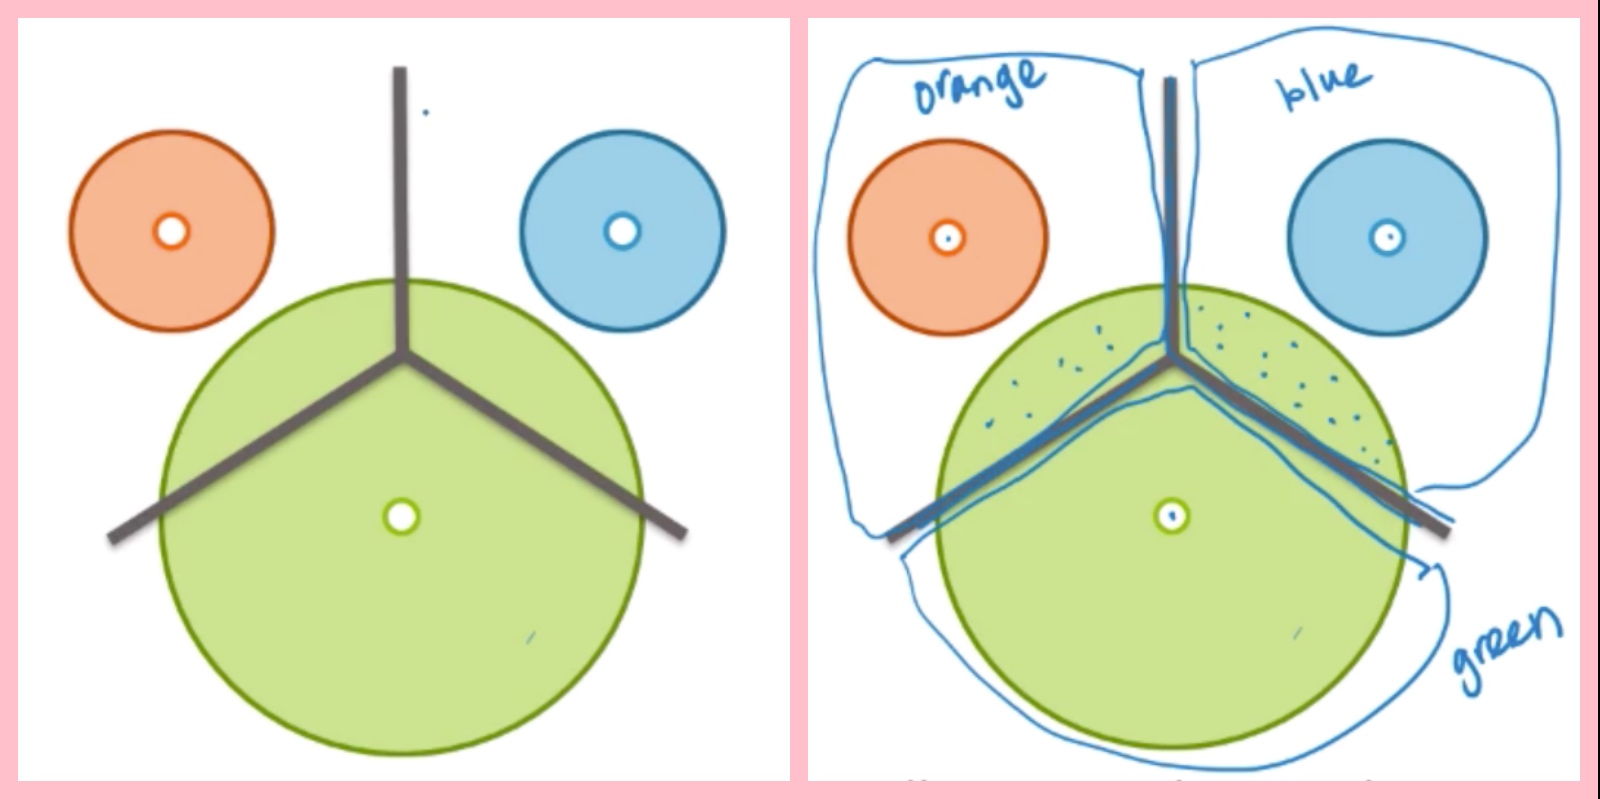
k-means是依據資料點彼此之間的距離來進行分群的,與群心越接近的資料點越會被分成同一群。但有時候資料的分群不能光看距離的,以下分別舉分個例子。

例子A: 各群的的大小不同

各群的的大小不同

如上圖左側所示,橘、藍、綠三個群體的大小並不相同,可是如果依照距離來做分群的話,就會依照中間的三條線(Benz’ logo?)來切出三個群。從右側的圖顯然可以發現,原本屬於綠色的資料點會被錯誤分群到橘、藍兩群。

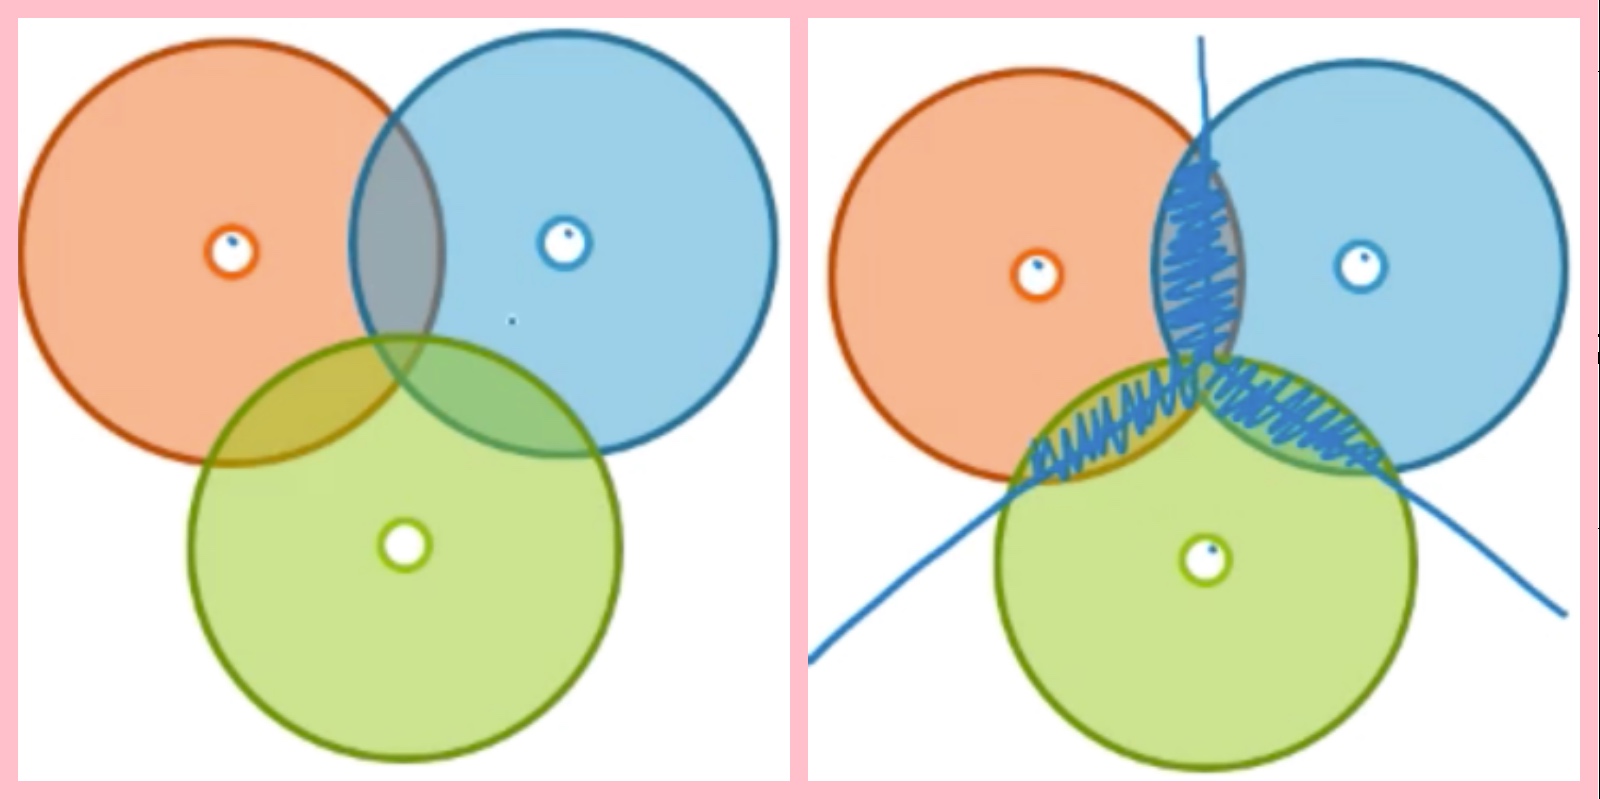
例子B: 群與群之間有重疊

群與群之間有重疊

第二個例子是重疊,如上圖左側可見,三個群體是有互相重疊(overlapping)的情況發生,我們很難判斷位於重疊區域的資料點應該會被分到哪一個群當中。可是如使用k-means做分群,那重疊的區域就會被強制分到一個群體當中(上圖右側),可能會有錯誤分群的情況發生。

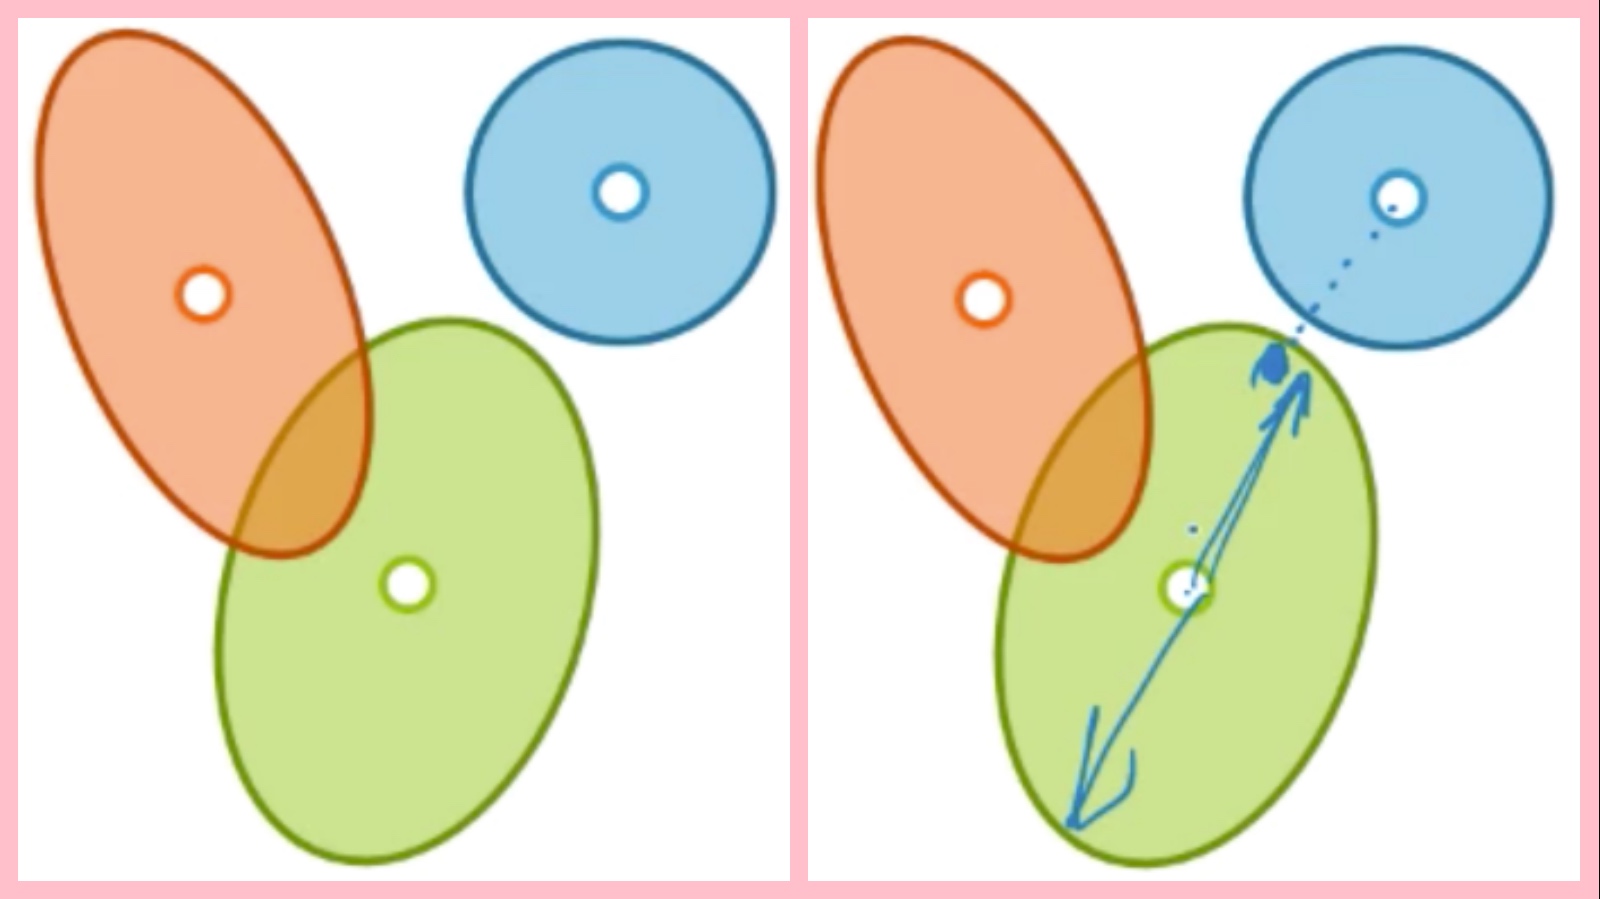
例子C: 各群的形狀不同

各群的形狀不同

最後一種情況就是群的形狀並非都是一致的,有些群體可以是橢圓(二維空間為例),而且橢圓的形狀也不一致,如上圖左側。但因為k-means的分群是依照距離來計算相似度,所以會有錯誤的情狀。如上圖右側的點,他應該被分為綠色的群,可是因為距離藍色的群心比較接近,所以會被錯誤的分成藍色的群。

Ref: Machine Learning: Clustering & Retrieval on Coursera

Lovefield 的資料匯出與匯入

發表於 2016-08-15   |   分類於 angular 2

title: how-to-import-and-export-data-in-lovefield
tags: angular 2


會使用到lovefield來開發程式,應該蠻有機會有需要用到匯出(export)與匯入(import)這兩個功能的,今天來介紹一下。

export

lovefield內建的lf.Database物件就提供了匯出與匯入這兩個功能,首先介紹匯出的部分。export會將程式內的資料庫轉為一個javascript的object。格式如下:

1
2
3
4
5
6
7
8
9
10
11
12
13
14
15
16
17
{
"name": <資料庫名稱>,
"version": <資料庫版本>,
"tables": {
<資料表名稱>: [
{
<欄位1>: <欄位內容>,
<欄位2>: <欄位內容>,
...
},
{ ... },
...
],
<資料表名稱>: [ ... ],
...
}
}

使用方式

在自己寫的servicelf.service.ts中加入一個新的function

1
2
3
4
exportDB() {
var exportedDb = this.myDb.export();
return exportedDb;
}

同場加映:如何將匯出的資料存成檔案?

我們要利用網址來將資料存為檔案,首先需要先import DomSanitizationService這個功能。
再來需要將href,file_name這兩個屬性做bind,所以先宣告,
最後寫一個function來call上面所寫好的service的export function。當使用者點選匯出資料庫之後,再點選下載連結就可以將資料庫存為檔案。
匯出資料庫示範圖

1
2
3
4
5
6
7
8
9
10
11
12
13
14
15
16
17
18
19
20
21
22
23
...
import { DomSanitizationService } from '@angular/platform-browser';
import { LFService } from './lf.service';

export class SettingComponent implements OnInit {
href: any;
download_text: string = "請先點選『匯出資料庫』";
file_name: string;
import_data: string;

constructor(private _lfService: LFService, private _sanitizer: DomSanitizationService) {

}
exportDb() {
this._lfService.exportDB().then((result: any) => {
// console.log(result);
var url = 'data:text/json;charset=utf8,' + encodeURIComponent(JSON.stringify(result));
this.href = this._sanitizer.bypassSecurityTrustUrl(url);
this.download_text = "按右鍵『另存連結為...』";
this.file_name = "my_db_backup";

});
}

該頁面的html

1
2
<button type="button" (click)="exportDb()" pButton label="匯出資料庫"></button>
<a [href]="href" [download]="file_name" target="_blank">下載</a><span> ({{download_text}})</span>

import

import部分需要先將原本資料庫的內容全部清空後(不是把整個資料庫砍掉),才可以進行匯入的動作。注意,匯入的資料的資料庫名稱與版本必須與原本的一致。

1
2
3
4
5
6
7
{
"name": <資料庫名稱>,
"version": <資料庫版本>,
"tables": {
...
}
}

匯入的不可以是字串string,必須是json的物件,所以要利用JSON.parse(data)來轉換(假設你的data原本是string)。

1
2
3
4
5
this.myDb.delete().from(this.myTable).exec().then(() => {
return this.myDb.import(JSON.parse(data)).then(function () {
alert("成功匯入資料");
});
});

同場加映:如何匯入date_time類別的資料?

有一點需要注意,那就是如果資料表的欄位有時間日期lf.Type.DATE_TIME的類別,則需要先行處理,不然會產生value.getTime()的error。本例參考stackoverflow改寫了一個dateTimeReviver,來處理yyyy-MM-ddTHH:ii:ss.fffZ的格式(ex: 2016-07-27T15:42:22.554Z)。把這個Reviver當做JSON.parse()的第二個參數即可。

1
2
3
4
5
6
7
8
9
10
11
12
13
14
15
16
17
18
importDb(data: string) {

var dateTimeReviver = function (key: any, value: any) {
var a: any;
if (typeof value === 'string') {
a = /^(\d{4})-(\d\d)-(\d\d)T(\d\d):(\d\d):(\d\d)(.\d{3}Z)/.exec(value);
if (a) {
return new Date(value);
}
}
return value;
}
this.myDb.delete().from(this.myTable).exec().then(() => {
return this.myDb.import(JSON.parse(data, dateTimeReviver)).then(function () {
alert("成功匯入資料");
});
});
}

[Note of Angular 2] 如何讓變數在兩個components傳遞?

發表於 2016-07-22   |   分類於 angular 2

title: ‘[Note of Angular 2] How to pass variable between two components’


情境 I:

有A B兩個component,B為A的child component,想要在B component 顯示 A component的變數。

檔案分別有以下四個,其對應到的selector分為別<A-selector>與<B-selector>,要傳的變數為myVar

  • AComponent.ts
  • AComponent.html
  • BComponent.ts
  • BComponent.html
  1. 在AComponent.ts的class中先宣告myVar

    1
    2
    3
    4
    5
    export class AComponent implements OnInit {
    myVar: number;
    ...
    ...
    }
  2. 在AComponent.html傳入變數

    1
    <B-selector [myVar]="myVar"></B-selector>
  3. 在BComponent.ts中 import Input功能,並宣告變數,變數前面需要加上@Input()

    1
    2
    3
    4
    5
    6
    import { Component, Input, OnInit } from '@angular/core';
    ...

    export class BComponent implements OnInit {
    @Input() myVar: number;
    }
  4. 接著就可以在B Component中使用該變數了

參考

  • Pass data from parent to child with input binding

情境 II:

接續上例,在B Component更動過該變數之後,想要讓A Component同時也發生變化。

  1. 在AComponent.ts的class中先宣告一個函數來處理B component更動到myVar的事件

    1
    2
    3
    4
    5
    6
    7
    8
    export class AComponent implements OnInit {
    myVar: any;
    ...
    ...
    onChangeVar(variable: number) {
    this.myVar = variable;
    }
    }
  2. 在AComponent.html中bind該事件

    1
    <B-selector [myVar]="myVar" (onChangeVar)="onChangeVar($event)"></B-selector>
  3. 在BComponent.ts中 import Output、EventEmitter功能,並宣告在1提到的函數,變數前面需要加上@Output()

    1
    2
    3
    4
    5
    6
    7
    8
    import { Component, Input, OnInit } from '@angular/core';
    ...

    export class BComponent implements OnInit {
    ...
    @Output() onChangeVar = new EventEmitter();
    ...
    }
  4. 接著就可以在B Component中使用該函數來傳回更新過後的值

    1
    this.onChangeVar.emit(newVar);

參考

  • Parent listens for child event

情境 III:

想要直接在 A Component中操作 B Component 的變數與函式

理論上父元件無法讀取子元件的變數也無法使用子元件的函式,但是我們在templete中可以藉由參考變數(reference variable)來使用子元件的變數與函式。

  1. 假設BComponent.ts有一個變數counter與兩個函式add()、minus()

    1
    2
    3
    4
    5
    6
    7
    8
    9
    export class BComponent implements OnInit {
    counter: number = 0;
    add() {
    this.counter += 1;
    }
    minus() {
    this.counter -= 1;
    }
    }
  2. 在BComponent.html中顯示counter這變數

    1
    <h1>{{counter}}</h1> in B Component
  3. 現在要在AComponent.html中使用add()與minus()來操作counter,首先要在<B-selector>中加入一個#開頭的參考變數。

    1
    <B-selector #myCounter></B-selector>
  4. 然後就可以在透過myCounter來使用BComponent的函式與變數

    1
    2
    3
    4
     <h2>{{myCounter.counter}}</h2> in A Component <br>
    <button (click)="myCounter.add()">+1</button>
    <button (click)="myCounter.minus()">-1</button>
    <B-selector #myCounter></B-selector>

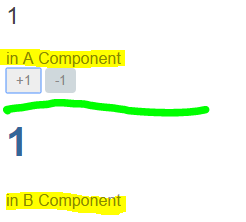
    結果如圖所示,上半段為A Component,可以使用兩個按鈕來操作B component的中變數
    after compiled

參考

  • Parent interacts with child via local variable
12
Ben-do

Ben-do

Angular, python, data mining, machine learning

20 文章
8 分類
19 標籤
© 2016 Ben-do
由 Hexo 強力驅動
主題 - NexT.Muse